Eclipse에서 Spring Boot 설정하는 방법

Eclipse는 이미 설치되었다는 가정하에 진행할게요
1. Help -> Eclipse MarketPlace 클릭

2. spring 검색 - Spring Tools 4 설치

[저는 이미 설치 되어있어서 Installed라고 되어있습니다]
4. 모두 체크 후 설치

5. file-new-project [Select a wizard] -> Spring boot 카테고리가 생성

6. Spring Starter Project 선택, NEXT

7. 아래의 3가지 체크 후 Finish
- Spring Boot DevTools
- Thymeleaf
- Spring Web

프로젝트 생성 후 시간이 조금 걸립니다!
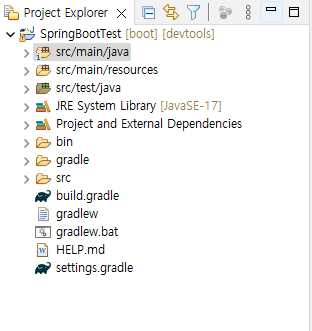
프로젝트 생성완료 시 아래와 같이 나타납니다.

프로젝트 생성 후 세부 설정 해보겠습니다
9. [application.properties]에 코드입력

# 서버 포트 설정
server.port=8081
# thymeleaf 파일 설정
spring.thymeleaf.prefix=classpath:templates/
spring.thymeleaf.check-template-location=true
# thymeleaf 파일 확장자
spring.thymeleaf.suffix=.htmlspring.thymeleaf.mode=HTML5
# thymeleaf 캐쉬 모드
spring.thymeleaf.cache=false
10. [HomeController.java]생성하기
하위 패키지 생성 후, HomeController.java 파일을 생성합니다.

입력 코드 |
package com.example.demo.Controller;

import org.springframework.stereotype.Controller;
import org.springframework.ui.Model;
import org.springframework.web.bind.annotation.RequestMapping;

// 컨트럴러 어노테이션
@Controller
public class HomeController {
	// 매핑 주소
	@RequestMapping(value = {"/", "/index.html"})
	public String index(Model model) {
		// 템플릿에 전달할 데이터
		model.addAttribute("data", "hello world");
		// 템플릿 파일명
		return "Home/index";
	}

}
11. 컨트럴러에서 호출한 Thymeleaf 템플릿을 설정- index.html 생성

입력 코드 |
<!DOCTYPE html>
<html>
<head>
<title>Insert title here</title>
</head>
<body>
<!-- 컨트럴러에서 받은 데이터를 출력 -->
<span th:text="${data}">message</span>
<hr>
<h1>hello</h1>
</body>
</html>
이렇게 템플릿 파일까지 생성이 되었으면 이제 실행
실행방법|
- Project Explorer의 프로젝트 또는 main 함수가 있는 곳에서 마우스 오른쪽 클릭
- Debug As
- 2 Spring Boot App

사진 설명을 입력하세요.
실행결과 |
1

사진 설명을 입력하세요.
2
주소: localhost:8080

이렇게 나타납니다!
사진: Unsplash의Boitumelo